NPC vehicles
Placing NPC vehicles

NPC Vehicles are vehicle actors that automatically drive around the simulation environment using a combination of internal driving algorithms and the map data of the currently loaded map. They allow the user to design different scenarios around the ego-vehicle.
Navigate to Edit >> Scenario >> Scenario Edit Mode from the main menu bar. Once in Scenario Edit Mode, the simulator will by default automatically enter placement mode.
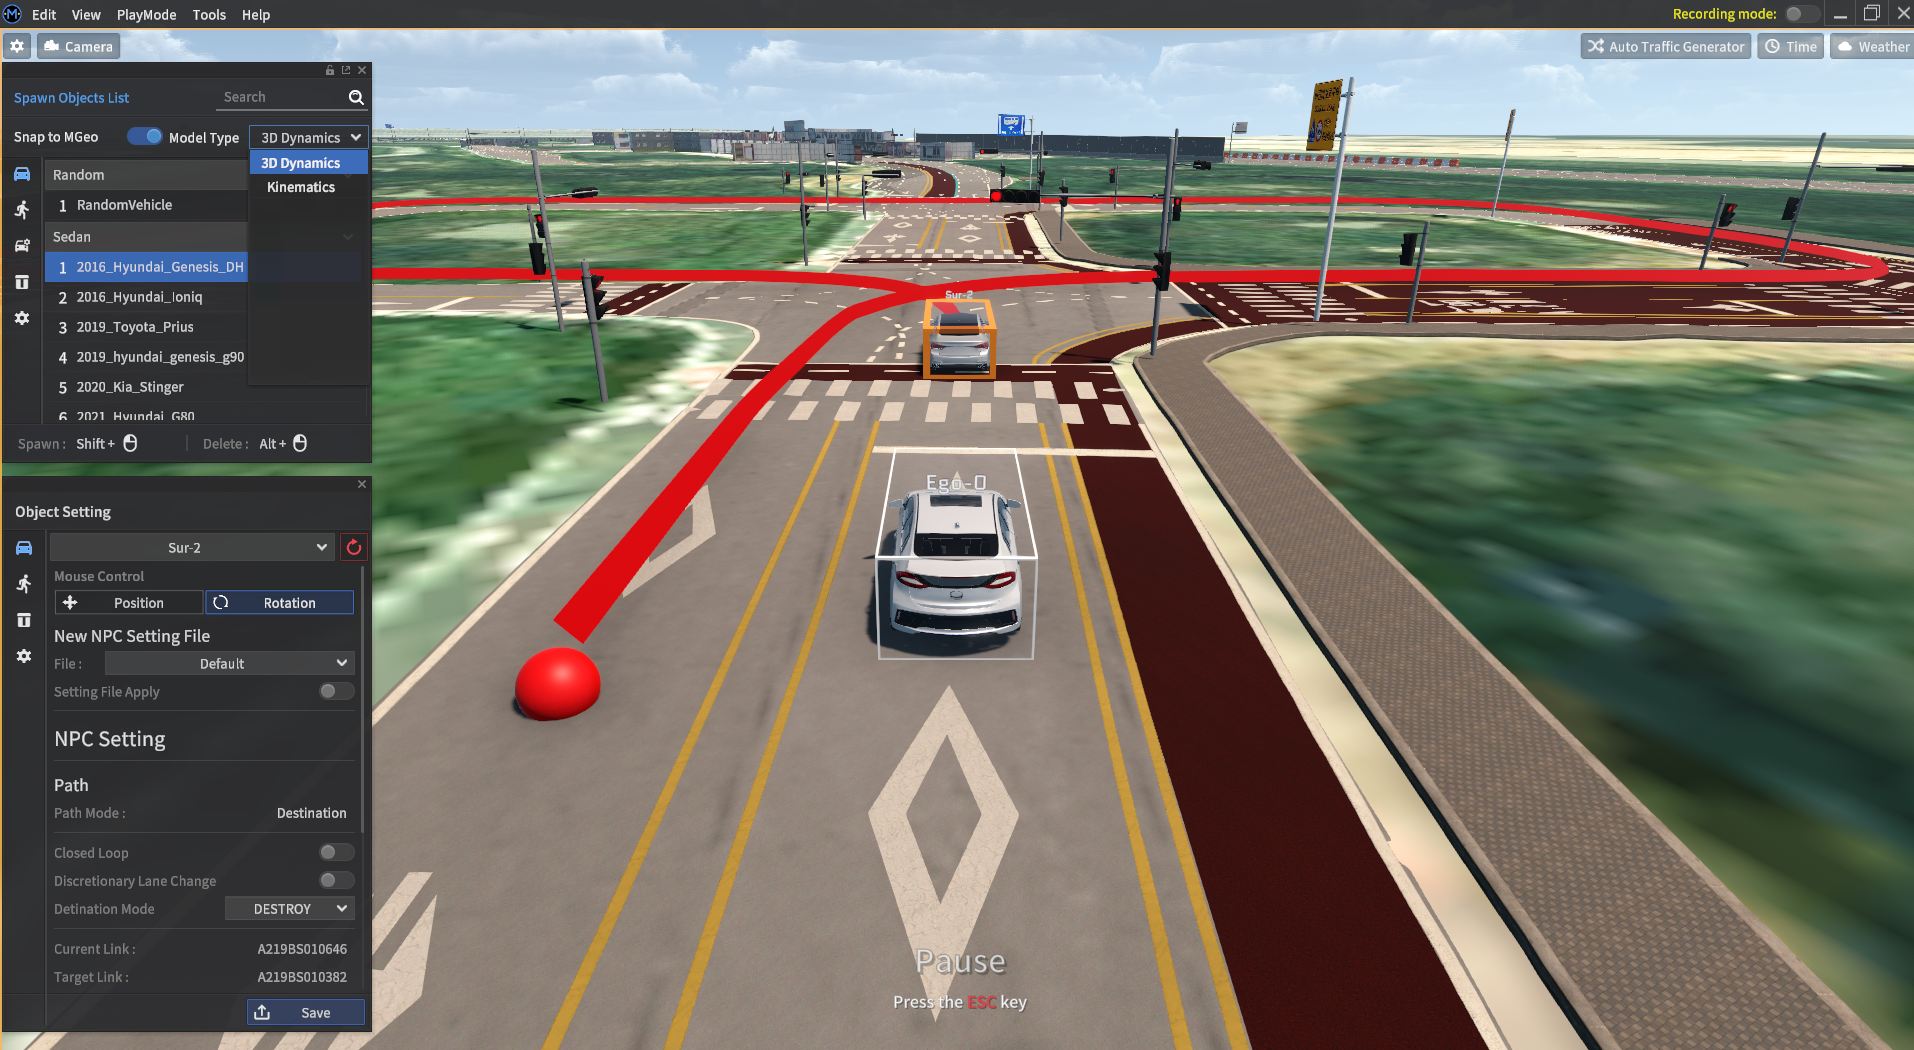
Choose the desired type of vehicle from the selection list window, then use Shift + Left-click along a road to place an NPC vehicle.
Alt + Left-click will delete a placed vehicle from the simulation scene.
The video below shows an example of placing the NPC Vehicle.
Perspective View control
By default, once the Scenario Edit Mode is activated, the simulator screen will shift to Perspective View Mode. The main scene camera is no longer fixed to the ego-vehicle, allowing the user to rotate and move the camera to different parts of the map. The specific camera control actions are as follows:
W/S/A/D: Forward/Back/Left/Right
Q/E: Up/Down
Mouse right-click + Up/Down drag: Control camera pitch
Mouse right-click + Left/Right drag: Control camera yaw
Top View Mode control
Clicking the camera icon in the top-left corner will bring up a drop-down menu with different camera view modes (read more about camera view modes here). Top View Mode switches the camera to a bird’s-eye view perspective - where you are looking down at the road environment from above. This is a more suitable camera angle for placing vehicles.
The specific camera control actions are as follows:
W/S/A/D: Foward/Back/Left/Right
Q/E: Zoom In/Out
Mouse right-click + Drag: Rotate the camera view
Mouse wheel: Zoom In/Out
Additional options for placing NPC vehicles
Dynamics model type
There are two different vehicle dynamics models to choose from before deciding on placing an NPC vehicle. Once a vehicle is placed, its dynamics model cannot be changed.
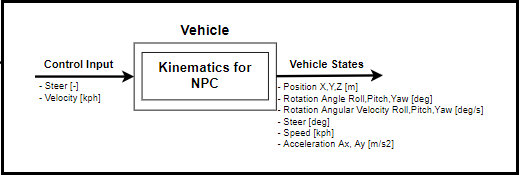
3D Dynamics Model: More accurate, but expensive. Using only 3D dynamics models for massive scenarios is not recommended.Kinematics Model: A simplified version that is computationally cheaper - allowing for more NPC vehicles to be placed simultaneously.
Here is a more detailed illustration of how the kinematics model works.
The differences between the models are as follows:
Input | Output | Remarks | |
3D Dynamics |
|
| - |
Kinematics |
|
| Roll, pitch assumed from bank/slope values of the road surface. |
Snap to MGeo
The Snap to MGeo toggle ensures that NPC vehicles are properly placed along MGeo links, which are the routes that driver models will follow during the simulation. Snap to MGeo may be toggled off if the user requires more freedom in placing their vehicle actors.
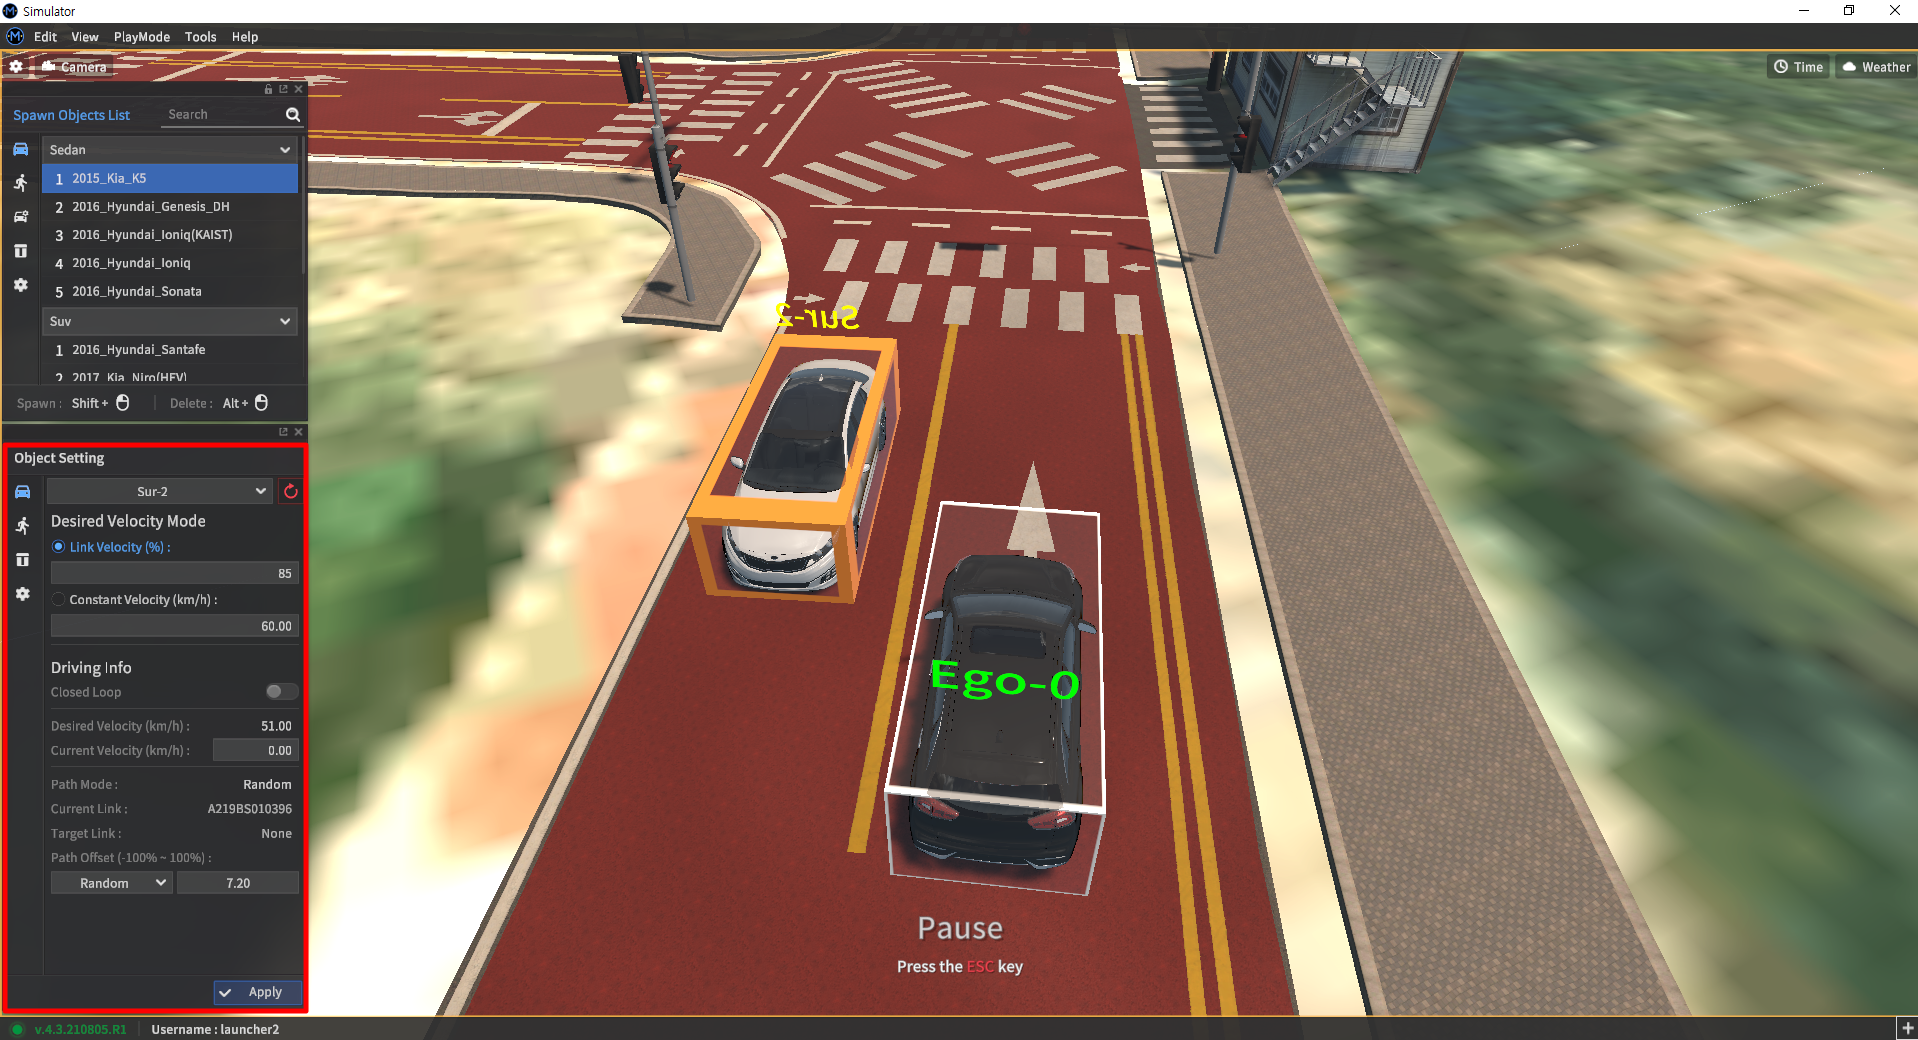
NPC vehicle settings
Once an NPC vehicle has been placed, a separate Object Setting window should appear below the Object List window. When multiple vehicles have been placed, you can switch between vehicles by clicking on a vehicle within the simulation scene.
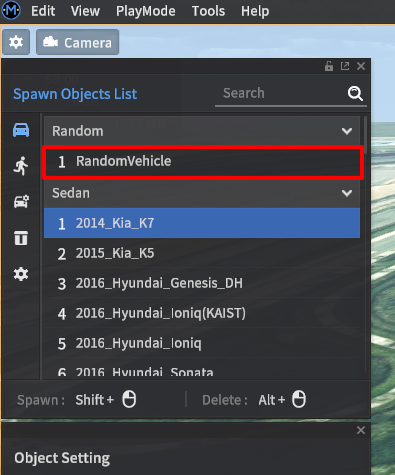
Randomizing the placed NPC vehicle
Under the Random section of the Spawn Objects List panel, click RandomVehicle. Every vehicle placed by pressing Shift + Left-click is randomly chosen from all currently available vehicle models.
Applying presets
Manually setting up the Path and Driving Parameter variables for every NPC vehicle placed in the simulation scene can become tedious. Use the Setting File feature in the Object Setting panel to quickly apply a preset configuration to the NPC vehicle. If there are any presets saved, use the drop-down menu to select the desired preset.
Save a preset file by first fully configuring an NPC vehicle’s settings, then pressing the Save button at the bottom of the Object Setting panel. Settings are saved as NPC_Setting_[number].
NPC Setting - Path
The Path settings contain all the path-finding options for NPC vehicles. Most path options require a destination node to be set. Read ahead to this section for details.
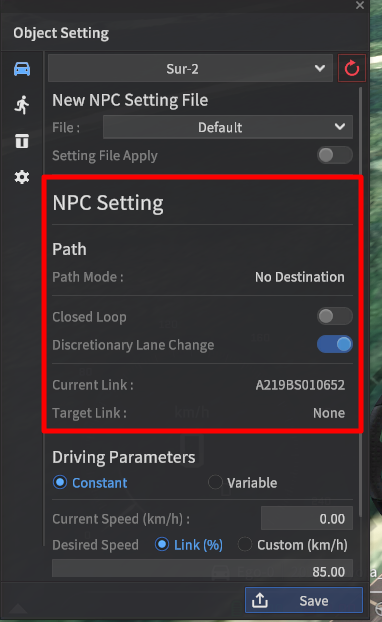
Path Mode: Defines how the NPC vehicle moves around the map.
No Destination: The NPC vehicle has no set destination point and will randomly drive around the map. Is typically the default value for all NPC vehicles.Destination: Indicates a specific destination point has been assigned to the NPC vehicle. Once reaching its destination the NPC will behave according to its Destination Mode option.Closed Loop: The NPC vehicle is in Closed Loop mode (see below).
Closed Loop: When Closed Loop mode is activated, setting a destination node will automatically determine an optimal path to the destination node and a path back to the starting node.
Discretionary Lane Change: When toggled, the NPC vehicle travels while arbitrarily changing its lane. When disabled, the NPC vehicle will not perform lane change maneuvers unless they are necessary to successfully navigate to its destination.
Destination Mode: Sets the behavior of the NPC vehicle upon reaching a set destination.
DESTROY: After the vehicle reaches its destination, the vehicle will disappear.STOP: After the vehicle reaches its destination, the vehicle will stop.
Current Link: Shows the link ID the NPC vehicle is currently driving along.
Target Link: Shows the link ID the NPC vehicle will reach next.
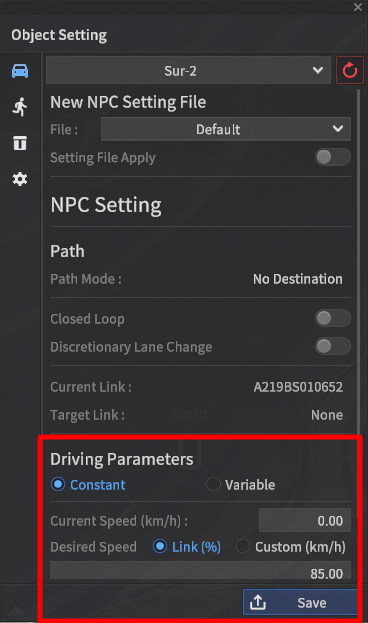
NPC Setting - Driving Parameters
Driving Parameters allow users to set specific settings for the NPC vehicle’s controller. The main parameters are target speed and how well the vehicle stays in its lane.
Driving Parameters:
Constant: Driving parameters are set to a constant value.Variable: Driving parameters are chosen randomly from a preset range.
Current Speed: When the NPC vehicle is first placed, this value can be used as an initial condition. Once the simulation starts, this field shows the current speed of the NPC vehicle. (units in km/h)
Desired Speed: Sets the target speed the NPC vehicle will accelerate to. Depending on the road conditions, the NPC vehicle may not be able to reach this target speed
Link: Vehicle speed is set to a percentage of a road’s speed limit.Custom: Vehicle speed can be set explicitly to a user-specified speed. (units in km/h)
Path Offset: Sets how far from the lane centerline the NPC vehicle will drive. A path offset value of
0indicates the vehicle will follow the lane centerline.
Setting a destination for NPC vehicles
By default, all NPC vehicles in MORAI SIM will randomly search for viable paths for each map.
This does not allow for the user to accurately control NPC vehicle behavior.
To set a destination for an NPC vehicle, while in Scenario Edit Mode,
Select an NPC vehicle (confirm the desired vehicle is properly selected by checking the Object Setting window)
While the vehicle is selected, Ctrl + Left-click at the desired destination point.
If a valid path can be made from the vehicle’s current location, a red sphere will be placed at the clicked location.
Else a number of error messages will be displayed on the screen.
Press the Escape button to exit Scenario Edit Mode - the NPC vehicle should immediately start to drive towards the destination.