Custom lidar sensor models
Overview
MORAI SIM comes equipped with a selection of lidar sensor models that emulate popular lidar sensors used in the AV industry. However, there are use cases that require full customization of the lidar sensor - such as when using an entirely new sensor, or for simulating errors in the lidar sensor. For these applications, a custom lidar configuration can be defined by the user and imported into MORAI SIM.
As of version 22.R1.0 custom lidar sensors can only be configured on ROS systems.
Building a custom lidar configuration
A custom lidar configuration can be defined in a separate .json file. Physical attributes such as the number of firing lasers, maximum range, rotation frequency, field of view, and firing angles should be defined in this configuration.
A sample template is provided below for reference.
By default, MORAI SIM looks for a .json file named Lidar in the following path MoraiLauncher_{os}_Data\SaveFile\LidarTemplate\Lidar.json. Saving the .json file under any other name will not work.
Custom lidar configuration JSON example
{
    "Name": "Lidar128",
    "LaserCount": 128,
    "MinDistance": 0.5,
    "MaxDistance": 245.0,
    "RotationFrequency": 10.0,
    "MeasurementsPerRotation": 1800,
    "FieldOfView": 40.0,
    "VerticalRayAngles": [ -11.742, -1.99, 3.4, -5.29, -0.78,
						4.61, -4.08, 1.31, -6.5, -1.11,
                        4.28, -4.41, 0.1, 6.48, -3.2,
                        2.19, -3.86, 1.53, -9.244, -1.77,
                        2.74, -5.95, -0.56, 4.83, -2.98,
                        2.41, -6.28, -0.89, 3.62, -5.07,
                        0.32, 7.58, -0.34, 5.18, -3.64,
                        1.75, -25, -2.43, 2.96, -5.73,
                        0.54, 9.7, -2.76, 2.63, -7.65,
                        -1.55, 3.84, -4.85, 3.18, -5.51,
                        -0.12, 5.73, -4.3, 1.09, -16.042,
                        -2.21, 4.06, -4.63, 0.76, 15,
                        -3.42, 1.97, -6.85, -1.33, -5.62,
                        -0.23, 5.43, -3.53, 0.98, -19.582,
                        -2.32, 3.07, -4.74, 0.65, 11.75,
                        -2.65, 1.86, -7.15, -1.44, 3.95,
                        -2.1, 3.29, -5.4, -0.01, 4.5,
                        -4.19, 1.2, -13.565, -1.22, 4.17,
                        -4.52, 0.87, 6.08, -3.31, 2.08,
                        -6.65, 1.42, -10.346, -1.88, 3.51,
                        -6.06, -0.67, 4.72, -3.97, 2.3,
                        -6.39, -1, 4.39, -5.18, 0.21,
                        6.98, -3.09, 4.98, -3.75, 1.64,
                        -8.352, -2.54, 2.85, -5.84, -0.45,
                        8.43, -2.87, 2.52, -6.17, -1.66,
                        3.73, -4.96, 0.43 ],
    "rotCorrections": [ 6.354, 4.548, 2.732, 0.911, -0.911, -2.732, -4.548, -6.354,
                        6.354, 4.548, 2.732, 0.911, -0.911, -2.732, -4.548, -6.354,
                        6.354, 4.548, 2.732, 0.911, -0.911, -2.732, -4.548, -6.354,
                        6.354, 4.548, 2.732, 0.911, -0.911, -2.732, -4.548, -6.354,
                        6.354, 4.548, 2.732, 0.911, -0.911, -2.732, -4.548, -6.354,
                        6.354, 4.548, 2.732, 0.911, -0.911, -2.732, -4.548, -6.354,
                        6.354, 4.548, 2.732, 0.911, -0.911, -2.732, -4.548, -6.354,
                        6.354, 4.548, 2.732, 0.911, -0.911, -2.732, -4.548, -6.354,
                        6.354, 4.548, 2.732, 0.911, -0.911, -2.732, -4.548, -6.354,
                        6.354, 4.548, 2.732, 0.911, -0.911, -2.732, -4.548, -6.354,
                        6.354, 4.548, 2.732, 0.911, -0.911, -2.732, -4.548, -6.354,
                        6.354, 4.548, 2.732, 0.911, -0.911, -2.732, -4.548, -6.354,
                        6.354, 4.548, 2.732, 0.911, -0.911, -2.732, -4.548, -6.354,
                        6.354, 4.548, 2.732, 0.911, -0.911, -2.732, -4.548, -6.354,
                        6.354, 4.548, 2.732, 0.911, -0.911, -2.732, -4.548, -6.354,
                        6.354, 4.548, 2.732, 0.911, -0.911, -2.732, -4.548, -6.354 ],
    "CenterAngle": 0.0,
    "TextureHeightFactor": 32,
    "TextureWeightFactor": 2
}Applying custom lidar configurations
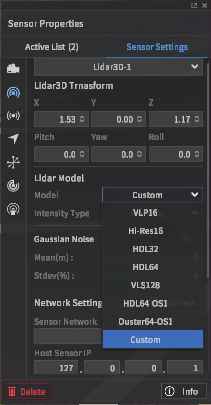
To apply the custom lidar configuration, place any 3D lidar model on the ego-vehicle. Instead of choosing a specific model from the drop-down menu, select the Custom option at the bottom of the list.
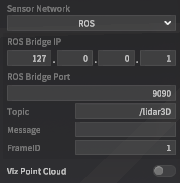
Set the rest of the interface parameters as usual, then click Connect. Custom lidar configurations will use the default PointCloud2 ROS message.
Visualizing lidar sensor output
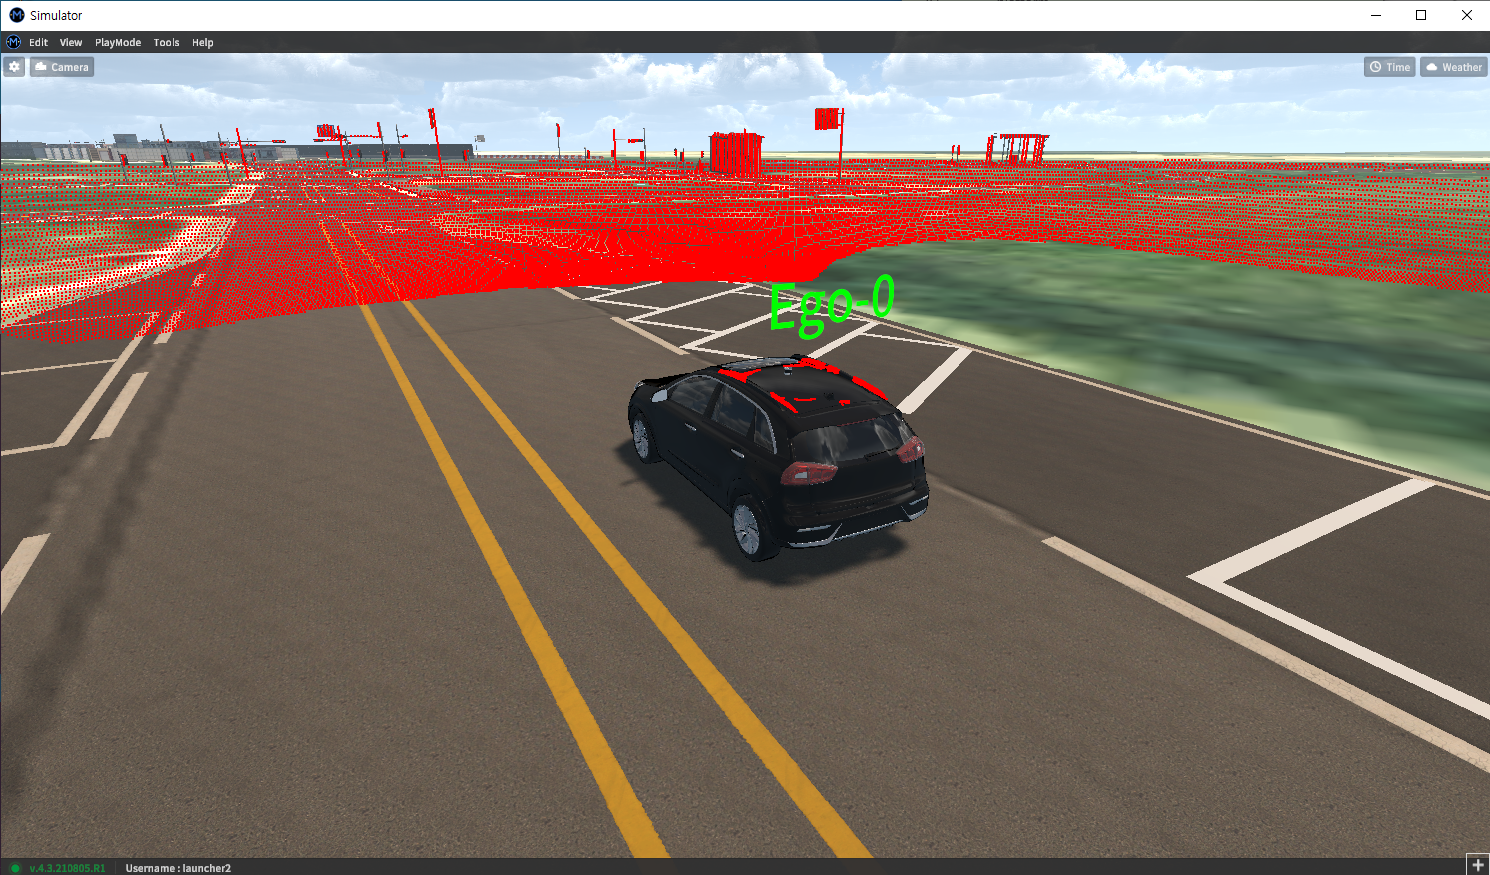
To see the point cloud output within MORAI SIM, toggle the Viz Point Cloud option at the bottom of the sensor settings panel. A point cloud should be overlayed onto the 3D scene, as seen below.
Or use external tools - for ROS, the most common option is RViz.
For this example, as the FrameID was set to 1 when connecting the lidar sensor to our ROS system, the Fixed Frame option in RViz was also set to 1.
